Una de las utilidades que le he encontrado al origami es la ordenación y organización de espacios. Una de mis amigas es una experta en ello y leer todas sus publicaciones me está enseñando mucho. El orden y los espacios ordenados trae calma y hace disfrutar más de tu tiempo, ya que no lo pierdes buscando cosas.
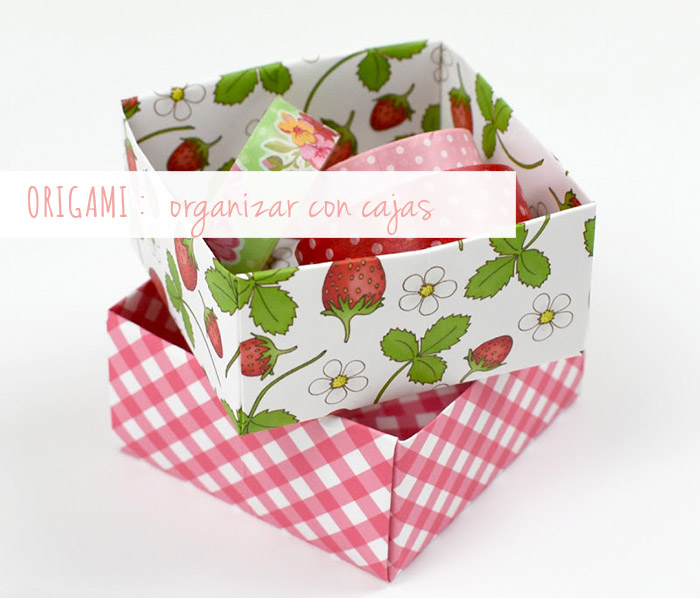
Hacer pequeñas cajas para organizar tu papelería es algo muy fácil. Hoy os voy a mostrar el tutorial creado por Hazel Fisher Creations.
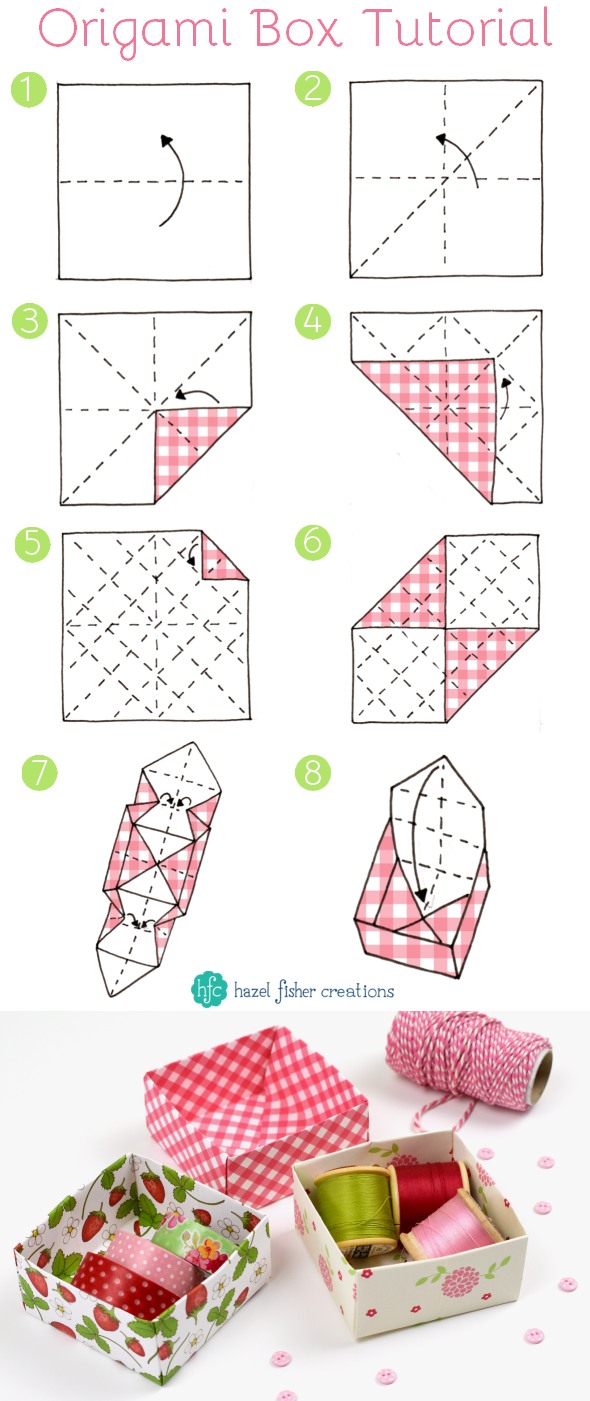
- Necesitamos un papel cuadrado, de 15x15cm por ejemplo. Empezamos con el papel hacia abajo, lo doblamos a la mitad en los dos sentidos y desplegamos.
- Doblamos y marcamos las dos diagonales.
- Llevamos cada esquina al centro y desplegamos
- Ahora llevamos cada esquina hasta el punto de tres cuartos de lado, como en el diagrama, y luego volvemos a abrirlo.
- Llevamos ahora cada esquina a un cuarto de ancho, y volvemos a desplegar todo.
- Doblamos dos esquinas opuestas al centro.
- Empujamos los lados hacia arriba para comenzar a hacer la forma de caja tridimensional.
- Finalmente doblamos las 2 esquinas restantes dentro de la caja.
Elige papeles con estampados bonitos y decora a la vez que organizas.
![]()
One of the utilities that I have found to the origami is the organization of spaces. One of my friends is an expert on it and reading all her publications is teaching me a lot. The ordered spaces bring calm and makes you enjoy more of your time, since you do not lose it looking for things.
Making small boxes to organize your stationery is very easy. Today I am going to show you the tutorial created by Hazel Fisher Creations.
- Start with your paper patterned side face down. Fold the square in half to form a rectangle. Open out and repeat in the other direction.
- Now fold your square in half diagonally, open out and repeat in the opposite direction then open out again.
- Fold each point into the centre, then unfold to your square again.
- Fold each point of the square to the point three-quarters across, as in the diagram below, then open out again.
- Now fold each point one quarter across, then once again open out to the square.
- Now fold 2 opposite points to the centre.
- Push the sides up to start making the 3-dimensional box shape (see diagram below).
- Finally tuck the remaining 2 corners inside the box.
Choose paper with beautiful prints and decorate at the same time as you organize.
![]()
Imagenes:hazelfishercreations